Tag Archives: craft

Afterthought Thrums

A couple of years back I was asked to teach a class on thrummed mittens. Naturally, I experimented with heaps of patterns in my quest to concoct the perfect mitten– but ultimately found that the most important thing is the construction of the thrum. I thought I’d share my recipe for the perfect thrum, plus a neat trick to replace missing thrums in your finished object.

How I make my thrums

My method is based on the Yarn Harlot’s technique, but there’s one important difference: instead of twisting in step 3, I use two fingers to roll the center of the thrum against the palm of one hand until it’s lightly felted.

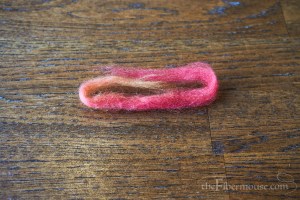
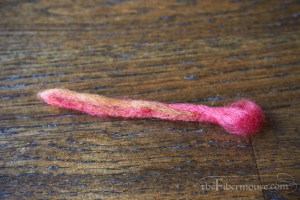
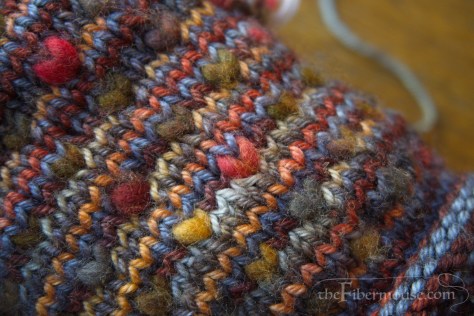
This creates a much more durable thrum than the twisted technique, and keeps the inside of the mitten from getting scraggly with wear. The poor half-mitten pictured below has been much abused as a teaching model, but the thrums are still as soft and puffy as when I made them. (Once washed and worn, they’ll felt and stick to one another a bit more.)

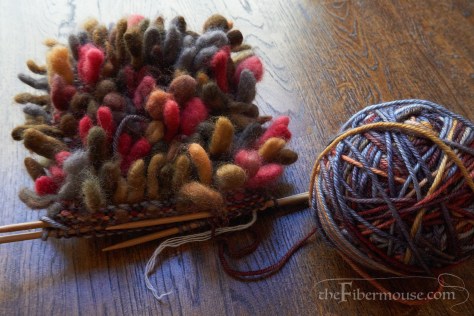
Your thrums should be a little bit thicker than the yarn you’re knitting with, but not so much that they distort the shape of the stitches. Once you knit them into the mitten, they’ll compress down to about the same size as the yarn and look like neat little hearts.

Inserting a thrum after the fact (i.e., “afterthought thrumming”)

Because the Perfect Thrum is neatly felted, you can treat it as if it were a short piece of yarn, and insert it into your knitting even after the mitten is complete. Reasons you might want to do this:

  • You accidentally left out a thrum while knitting.
  • You accidentally pulled out a thrum while knitting.
  • One of your thrums was mangled in a tragic accident, and you yanked it out in pity.

To fill in the empty spot on your mitten, you’ll need a crochet hook in a size suitable for your yarn (or slightly bigger) and a spare thrum.

  1. Find the stitch where the missing thrum belongs, then insert the crochet hook under both legs of the stitch immediately above that one.
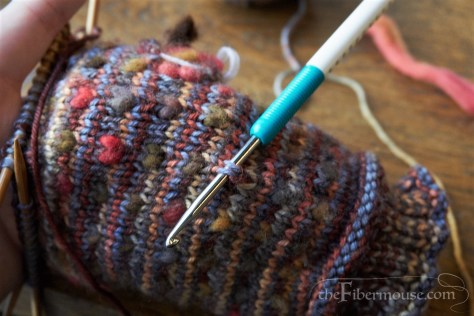
  2. Catch one end of the thrum and pull it through.
  3. Put the crochet hook inside the mitten and bring up the hook at the base of the stitch you’re thrumming.
  4. Catch one leg of the thrum and pull it down inside the mitten.
  5. Repeat with the other leg.
  6. Smooth the fabric around the thrum with your fingers.7. Admire your handiwork!

More thrumming tips

dsc00780

  • To take your thrum knitting out on the road, prepare a batch of thrums in advance and carry them in a small organza gift bag– the fabric is stiff enough to protect your thrums from squashing, and keeps any fuzzy bits from escaping.
  • Whether you’re working from a kit or following a pattern, you probably have a bit of commercially prepared top or roving with which to make your thrums. Don’t cut your fiber– just grab a pinch from one end and pull! If the fiber won’t come apart, make sure the roving isn’t twisted and move your hands farther apart. You can also strip it down lengthwise to help keep the width of your thrums consistent.
  • You can insert afterthought thrums with a very short tapestry needle using duplicate stitch, but I find this rather more fiddly than the crochet hook method.

Save

Save

Festivities

Honestly, I tried to cut back on handmade gifts this year.

Of course, that turned out to be boring. So when, in mid-December, my grandmother told me that she was hosting a family gift exchange…

Handwoven Baltic-style inkle keychainsI made these. Hooray! It’s not Christmas without a last-minute project.


Last year, I… well, I started a small fire that happened to melt my mother’s old advent wreath. So I took some wool scraps from the Dorr Mill store and appliquéd her a new one:

Hopefully, this wreath is less flammable.


We also had a solstice party. I made a Yule log.

IMG_7291-001

The log appeared to be in an advanced state of decay, but taste tests were favorable. The meringue mushrooms received especially good reviews.


From my trusty bin of wool scraps, I whipped up some stockings for us and the pigs and tacked them to the wall:

1-IMG_7106It was a pretty sloppy effort, but the rodents in question were very excited to find parsley in their socks.


And last but not least, look what my significant other surprised me with: an antique reel!

1-IMG_7122From what we can tell, it probably dates to the late eighteenth or early nineteenth century, and was probably made in Quebec. Any opinions on the subject would be appreciated. Aside from two nails in what is an obvious repair job), the joinery is entirely wood pegs and mortise-and-tenon joints. The wood looks like pine.

Whatever its provenance, it’s in beautiful shape and makes a tidy skein. The reel now lives in our living room where I can admire it from my knitting chair.


I hope you all had a pleasant holiday, if you celebrate any, and that you have a happy 2015!


My spring wardrobe

Okay, it still needs a bit of work:

I’m also expecting a big batch of linen solids. Some of these are earmarked for my 16th-century lacemaker outfit, which I’ll tell you all about soon!

(You may have noticed I’m experimenting with short photo posts in lieu of my usual monstrosities. Let me know if you like this format, or if you’d rather I save up content for longer posts.)

Country Living

And we’re back!

IMG_0151

Over the last two months, I have:

  • Hugged a chicken (live)
  • Stuffed a rabbit (knitted)
  • Made a Honiton lace pillow
  • Watched two baby doves hatch, grow, and fly away
  • Introduced guinea pigs to the wonders of fresh grass
  • Learned new recipes
  • Spent time with family
  • Knit things

I’ve been staying with family since the beginning of April while I recovered from surgery. Fortunately, my hands were unaffected, so here are a few highlights from the crafting front:

1. A second Henslowe, shown above.

2.The Christmas coverlets. Remember that big, mysterious project with the giant cone of yarn? Here’s what it turned into:

IMG_9117

Here’s one folded across the back of a chair. Each mini-coverlet is about 30″ x 40″.

IMG_9285

3. A rabbit.

IMG_9972

4. A snail.

4. A little bird.

IMG_0058

And, okay, I admit it– I took a fence shot of the Henslowe:

IMG_0145

More to come on both the finished-object and work-in-project fronts. Stay tuned!

Playing catch-up (and with bobbins)

Crafting has been rampant in these parts as of late, even if the same cannot be said of blogging. I started a two-month bobbin lace course at the end of January, and have spent many hours making tiny samples, learning stitches, and occasionally sprouting side projects to try out my budding skills.

IMG 8921

I have spent an equal number of hours drooling over lace bobbins. They’re the perfect combination and/or perfect storm of small, collectible, relatively affordable (unless you go in for gemstone inlay and elaborate turning), beautifully crafted, useful objects. You can find all sorts of bobbins designed for different aesthetic and functional purposes, and the history of the various types is very interseting. And if you actually make lace, you can justify having a large collection. My biggest project to date called for 19 pairs, but some laces call for hundreds.

IMG_9017

My significant other and I spent a weekend in Ottawa recently, and naturally, my lace homework had to come with us on the train. Some people bring laptops; others bring lace pillows. However, I discovered that it’s actually rather difficult to make lace with the correct tension while moving. My teacher was not tremendously impressed with the results.

On a completely unrelated note, this was the view from our hotel room: the Canadian Parliament. Amazing!

IMG_8688

Right now, I’m working on some trim, just for fun. It’s up to about twenty inches: we’ll see how long I can go. The Canadian Lacemaker Gazette runs a “five-meter club”, but I didn’t wind anything close to five meters on those bobbins. The weaver’s knot (a brilliant invention) may come to my rescue once again.

IMG 8933

Knitting is also making its semi-annual resurgence. In addition to trudging along on the several thousand projects I started last summer, I picked up a few new techniques (Continental!) and am working my way through the new Free-Sole Sock DVD. So far, excellent; I made a mini-sock and learned to knit backwards. I’ll be spending next month recovering from surgery, and hope to have enough mental capacity available to finish at least a few of the four socks, three mittens, two sweaters, and one shawl that I keep meaning to wrap up. There are also a couple of crochet projects yammering at me to finish them. Plus various modifications to existing items, such as a perfectly respectable hat that the recipient shunned as “not warm enough”. At least that can wait until next year. Hmph.

I imagine that weaving will have to take a short hiatus. I’ll be staying with family for a while after the surgery, and though it might be feasible to pack a simple loom or two, I probably wouldn’t use them (I will, after all, be convalescing). Spinning will be subject to similar constraints, though I might pop a spindle in the suitcase. You know, for emergencies.

Also squared away in advance of my departure: two giant bags containing four stinky fleeces. Since my S.O.’s threats of disposal were increasing in proportion to the sheepy smell, I spent the better part of a weekend scouring wool in the bathtub. (And then bleaching the bathtub so as to render it fit for human use.) These fleeces were free, which as fiber-prep folks will know, is a mixed blessing. In the end, I kept the two best fleeces and disposed of the other two, which were heavily matted and very dirty. The ones I kept are of an unidentified longwool: Lincoln or something close to it, but I didn’t have the chance to ask the shepherd since the fleeces were a surprise present (thank you!). Anyway, I now have one white fleece and one black-brown fleece. No plans for them yet, but maybe I’ll make a two-toned fleece rug this summer, à la Anne Field.

Now, there is fringe to be twisted and hems to be stitched. Or I could act like an adult and start my taxes. Thoughts?

Sometimes the magic works…

I am constantly surrounded by a variety of projects in different stages of completion. As much as I try to be conscientious about finishing them, I’m never certain which ones will make it all the way from idea to finished item and which ones never make it past a conceptual stage. The frenzied and involuntary planning mindset that strikes me with a brand new idea is always the same, but sadly, its priorities are often out of sync with what reason would recommend.

A pile of scrapped plans.

When I ordered my nice new kantele, I was planning to construct it a gig bag, a light case to carry it around. Although I had plans and a parts list, this is one of those ideas where time and budget actually made it more practical to purchase a pre-made bag. (For one, I don’t own a sewing machine.) As much as I enjoy creating my own things, I can’t make everything myselfotherwise I’d probably have built the harp, too.

Yeah, I’m all talk.

I console the yearnings of my creative soul by pointing out to it the appealing embroidery on the yoga bag. As far as my dreams of luthiery go, well… I have no consolation, although I did build a plywood lyre for a long-ago Latin class.

Other projects get lost along the way, and find themselves mired in a state of potentially permanent incompletion. I find it a bit distressing to have these lying around my studio and usually find something to do with them, but there are a few that still sit waiting to be put to use. Short, flawed samples of tablet weaving come to mind.

They do make wonderful cable ties!

Another class of projects is that of the almost-finished. The failing here is in discipline more than in craftsmanship.

My first rag rug. One day soon it will be hemmed. Honest!

But there are indeed finished projects, with all of their various levels of success.

I won’t lie: I liked this one.

It’s satisfying to finish a project, but that’s not always why I make things. I love exploring ideas and testing hypotheses, improving my skills and learning as I go. Since the only deadlines and objectives of Crafting Time are my own, I’m able to follow a whim and see what happens. This occasionally means rebelling against the more organized part of my mind that grumbles and demands an orderly step-by-step approach. Sometimes it pays off, and sometimes it doesn’t.

Thus, I’ve abandoned the long-awaited tambour project. Anyone who enjoys this sort of hobby has to be willing to let go of a non-starter. I suppose that in the abstract there’s no shame in letting go. Of course, it’s not really that easy to give up! So instead of cutting the project off the loom, or simply tossing my efforts in the samples bin, I took the warp in a new direction.

When my crafting buddy came over last weekend, we had planned to spend the afternoon spinning away. Instead, we gravitated to the loom, then occupied by some uninspiring white plain weave. My friend was not yet a weaver, so I handed her a shuttle, and the next thing I knew, she was weaving away like a duck in water. (If ducks wove. What a dreadful simile.)

Since we only had a few minutes for an impromptu lesson, I did the hemstitching and finishing, but the rest is chopsticknitter‘s excellent work.

I taught someone to weave! At least a little bit. It was very very exciting, and my friend’s enthusiasm inspired me to make better use of the warp than simply stabbing at it glumly with an embroidery needle. After she left, I quickly wound some of my handspun onto a bobbin and threw it through a plain-weave shed, just to see what would happen.

Nothing fancy. Actually pretty sloppy. But I’ve decided to devote the rest of the warp to experimentation, and I’m back to my usual excitement about weaving. So I’ve learned two things: that teaching someone a craft you love is delightful, and that in certain circumstances, abandoning a project gives you the creative kick in the pants you need. I’ll let you know what comes of it all.