Tag Archives: medieval

The Tapestry Post

Last year, my local reenactment group won its bid to host a high-level competition in Arts and Sciences, which encourages research and experimentation in almost any sphere of medieval technology. As it happened, I’d been looking for a long-term project to sink my teeth into– an ambitious project to improve my skills. (Rather than, say, a sweater to dawdle over for a year or two. Several of those are already hibernating cozily in the nooks and crannies of my apartment.)
So, I knew right away that I wanted to enter something. But what? I could make early Renaissance lace-trimmed goodies. I could build miniature models of historical looms. I could print woodcut maps…. I was at this stage of deliberation when, as I idly browsed museum websites, it struck me.

I could weave a tapestry

I’d done a few samples back in 2011 and 2012, but not much, so there was some prep work to do. To put together a compelling entry (and for my own senses of academic propriety), I had to research the history and development of tapestry weaving in Europe and worldwide, I had to determine the appropriate techniques and materials, and I had to… learn to weave tapestry. With six months to go, I set to work.

Now, I knew that I didn’t want to design my own picture from scratch. The tapestry medium has some unique properties that I thought would be difficult for a novice weaver to predict. I also knew that I wanted to do something small in scale.


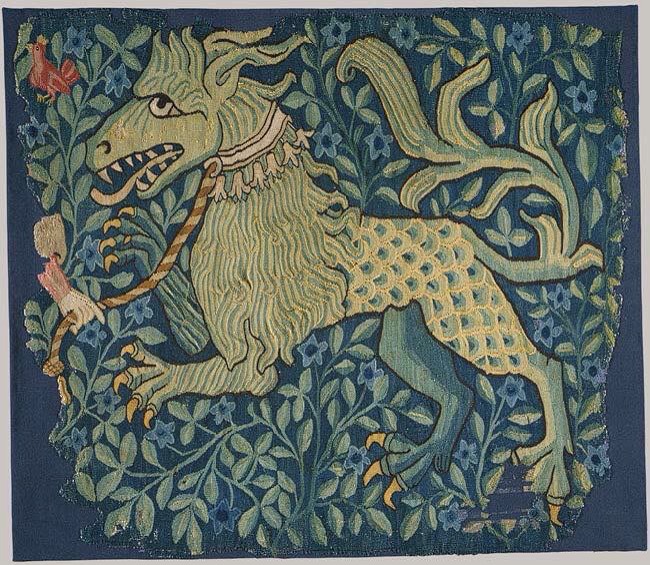
Source: http://www.metmuseum.org/toah/works-of-art/1990.211

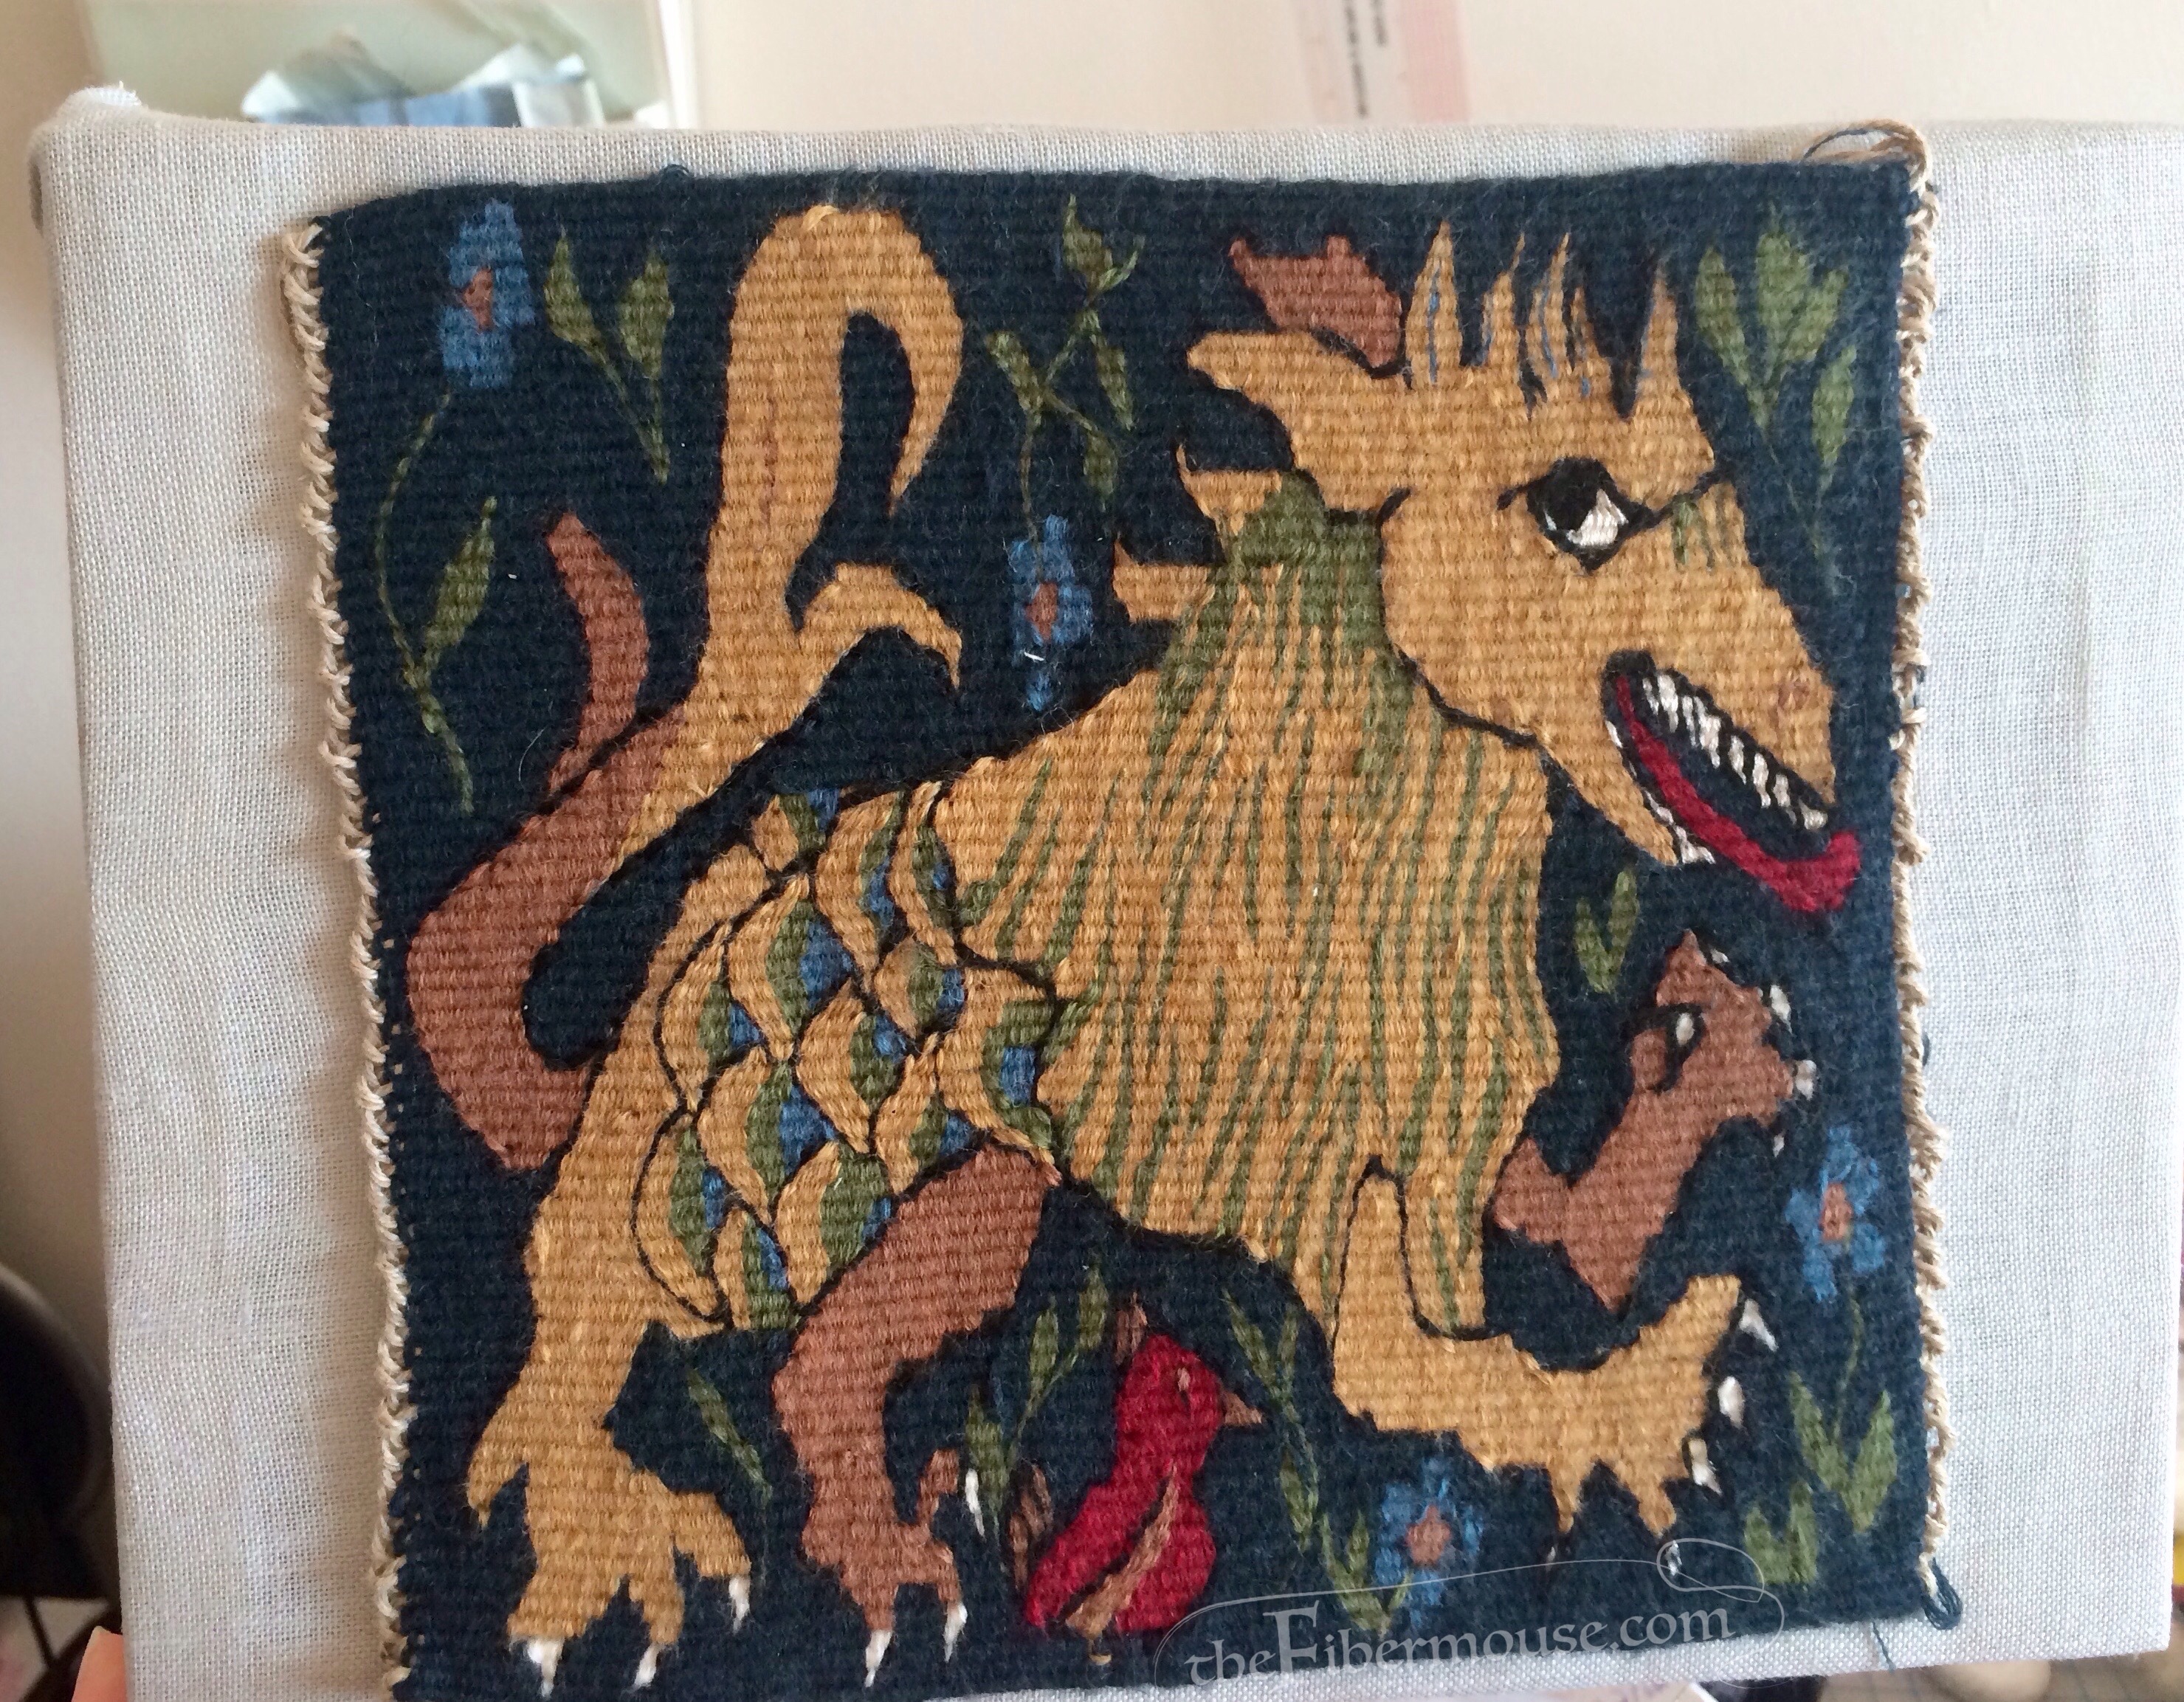
This delightful creature lives in the Met. He’s about three feet square, a fragment of a larger hanging. According to the experts, the collar symbolizes restrained lust or the taming of nature or something along those lines— however, I just found him endearing.

When adapting the design of the Fabulous Beast to a smaller format, I scaled certain elements up and down and reduced the overall level of detail. Here are some of my cartoon sketches:

  
I planned  to weave my beast in the opposite direction from the original tapestry. This, I thought, would make it easier to compare my weaving to the original as I wove from the back of the tapestry. (As it turned out, I would have been fine either way, but that’s mostly thanks to the new loom I purchased partway through the project. Photoshop felt like cheating, and also I didn’t think of it.)

I also wove the image sideways. Vertical elements (like trees and legs) are much more smoothly woven at a 90-degree angle to the warp, and if you look at the warp ribs in the original tapestry, you can see that it too was woven sideways. 

So, that was enough to start with. On to the materials!

Here’s what I planned to use:

  • Handspun 8/3 linen warp
  • Handspun, naturally dyed Wensleydale weft
  • My Good Wood Slant loom, propped up vertically, with an 8-dent rigid heddle as a raddle and string heddles for shedding

Here’s what I actually used:

  • Webs 8/4 linen rug warp
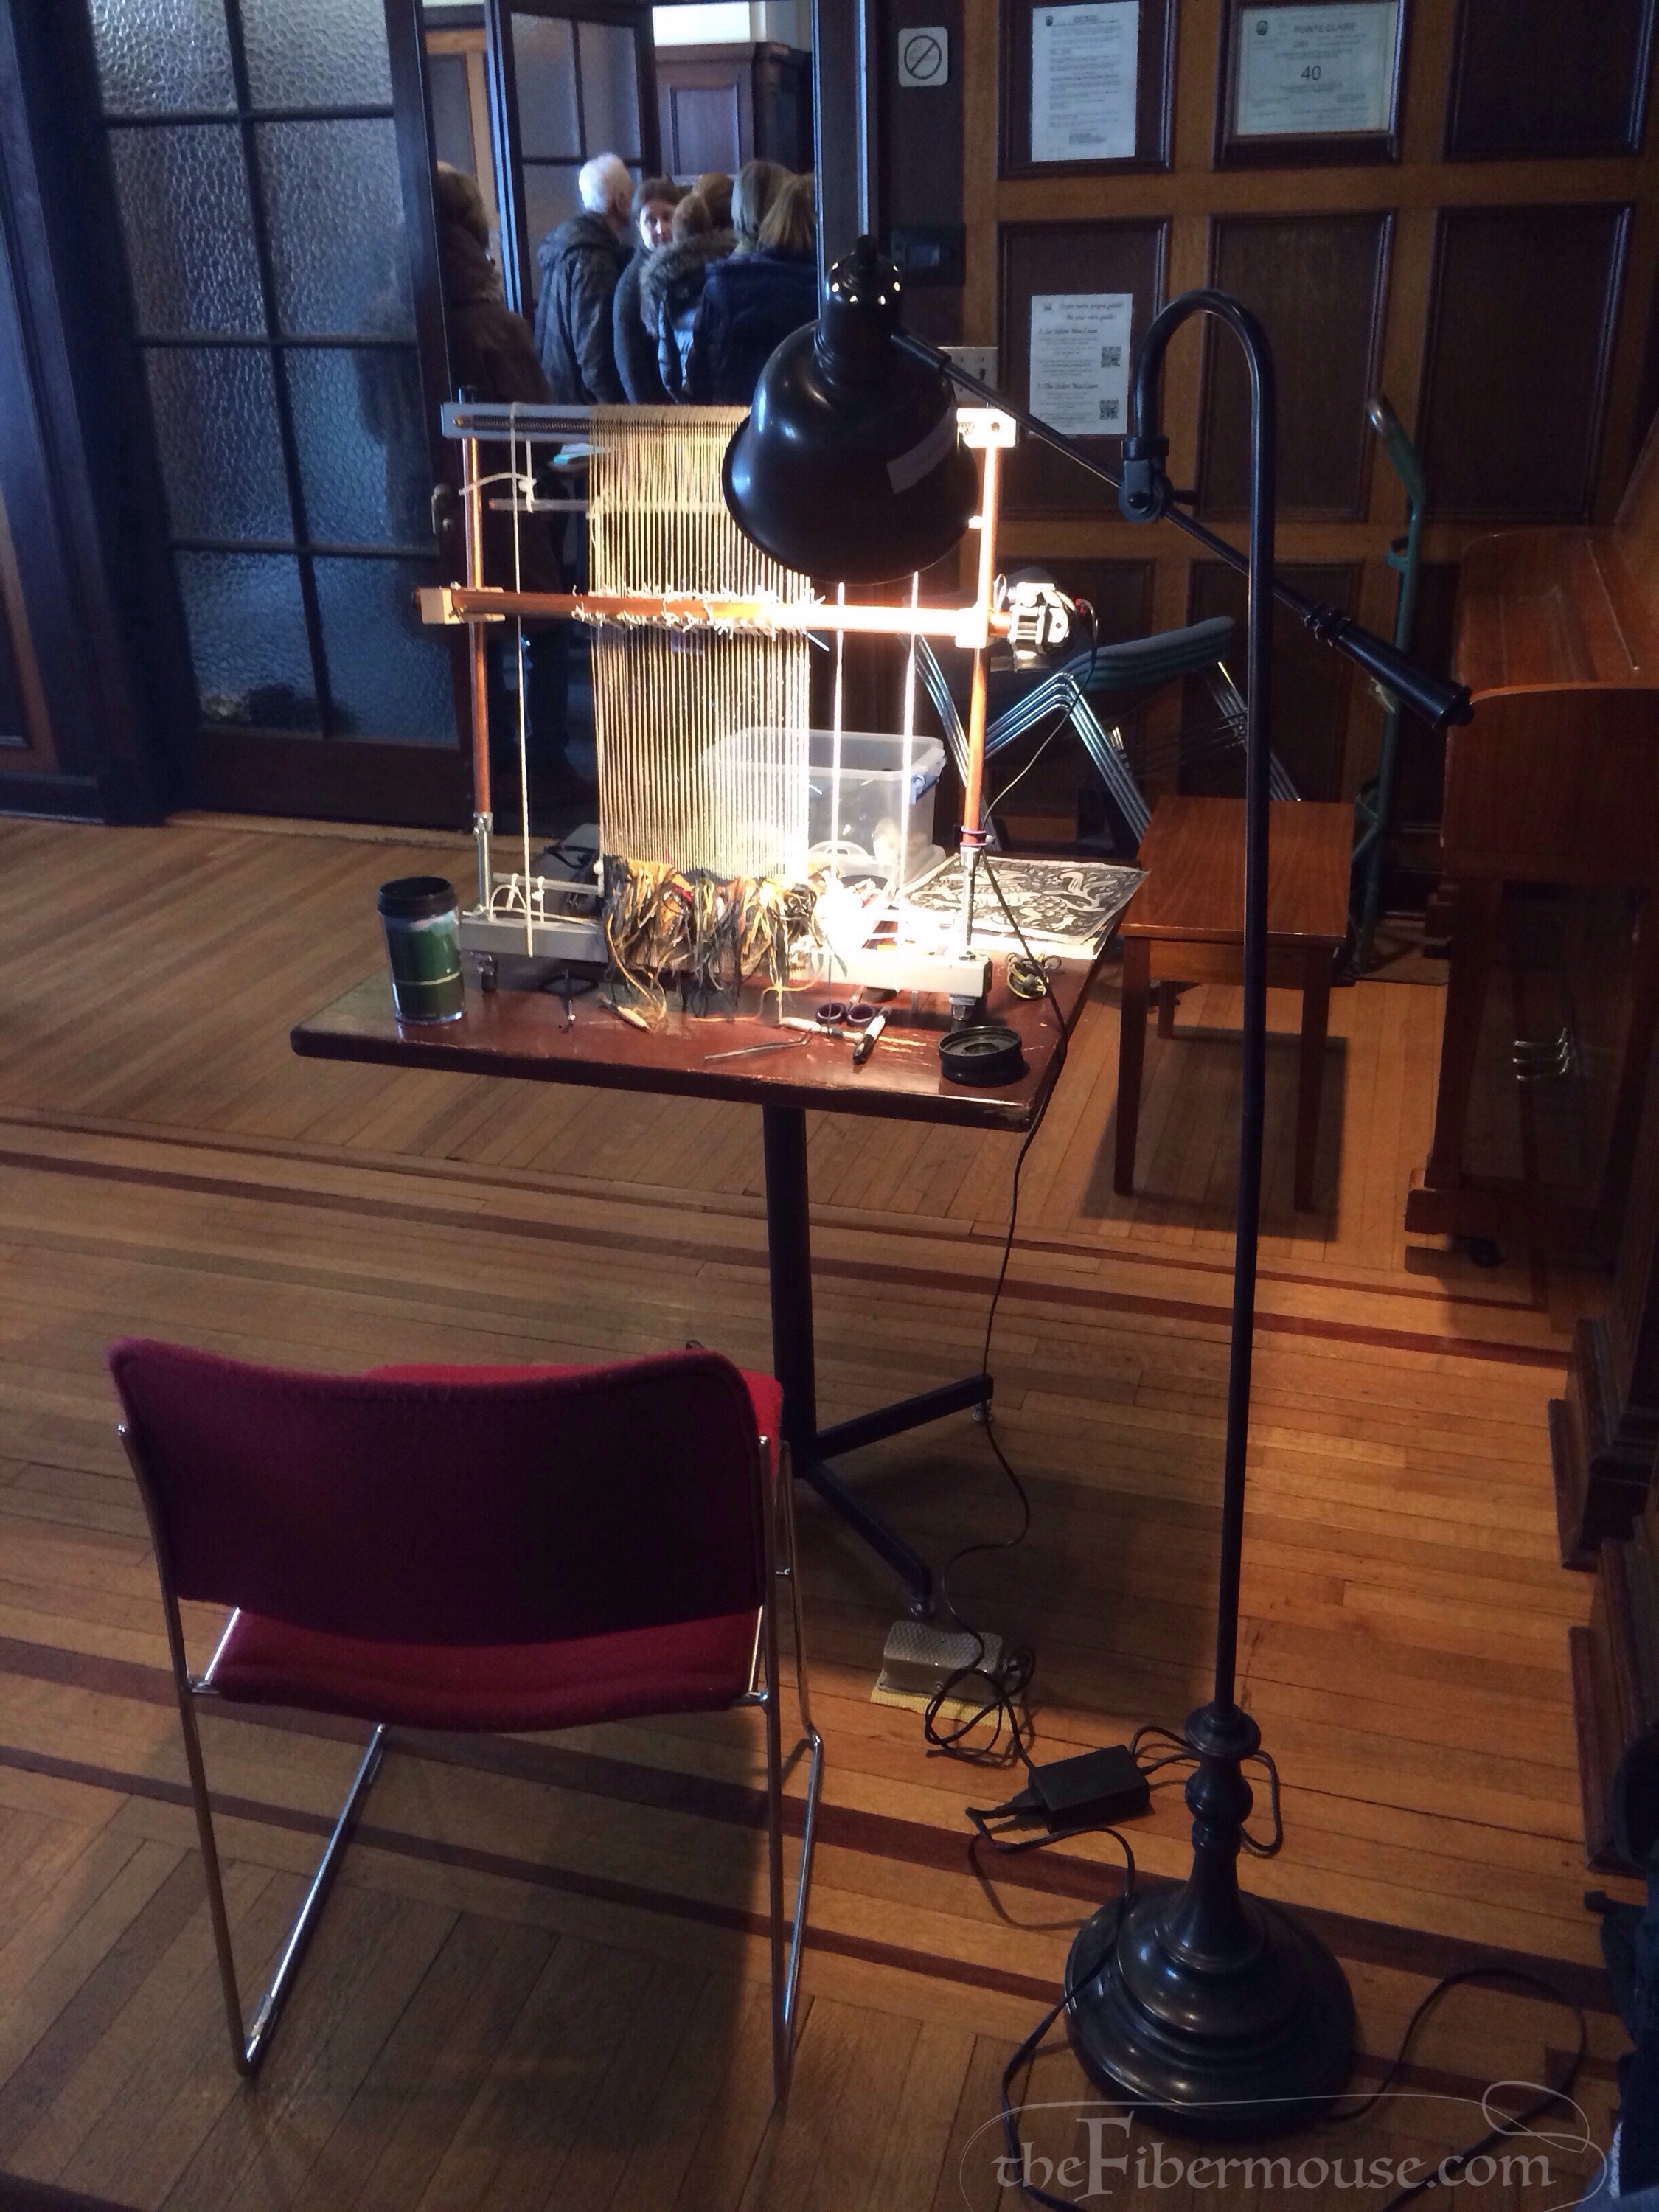
  • Habu 48/2 merino, 6 strands together, for weft
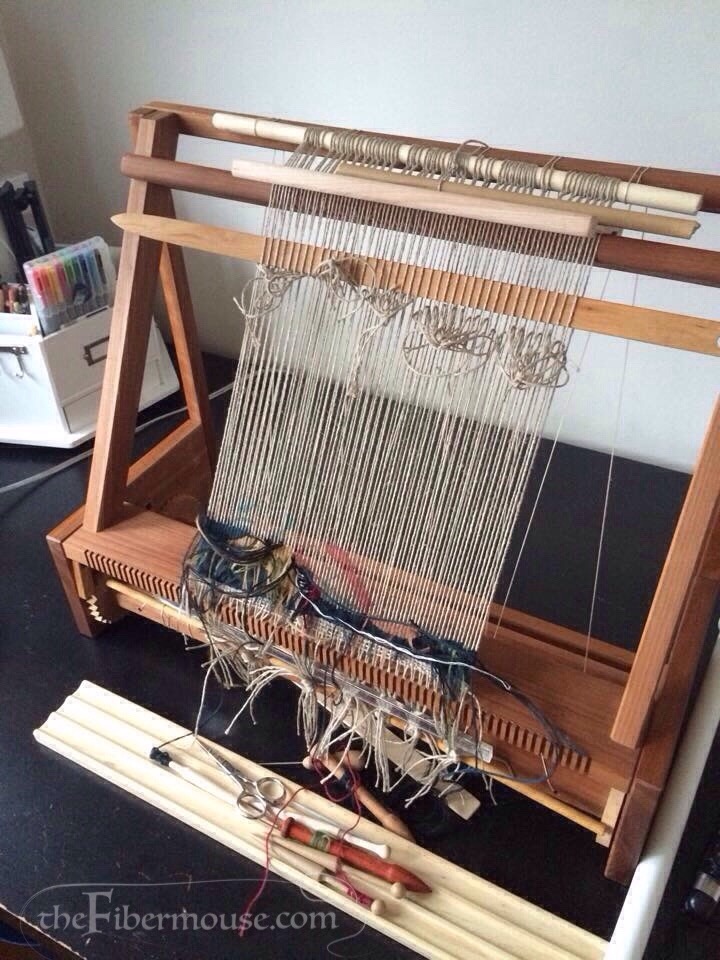
  • A new and shiny Mirrix Zach loom with treadle

 I set up a sample with the Webs rug warp and had at it. As the sample progressed, I was actually quite pleased with the results I was getting, so I continued on with it… right until my poor cherrywood loom, which really wasn’t designed for this, started torquing under the tension. 

  
Oops! (Who could have seen that coming, right?) 

I scratched my head over an assortment of frame looms, priced out the cost of building a copper loom, scoured Craigslist ads for used tapestry looms– suffice to say that after a complicated series of events, I obtained a Mirrix at the end of December. Hooray

But by then there was no time to spin the Wensleydale, and no budget left to order the dyes I wanted. I was able to spin a reasonable rug warp out of the flax sliver I had on hand, but thought my time would be better spent… well… I was impatient to get that beautiful loom warped. 

I was up and weaving again on January 1st.


The deadline was in early March.


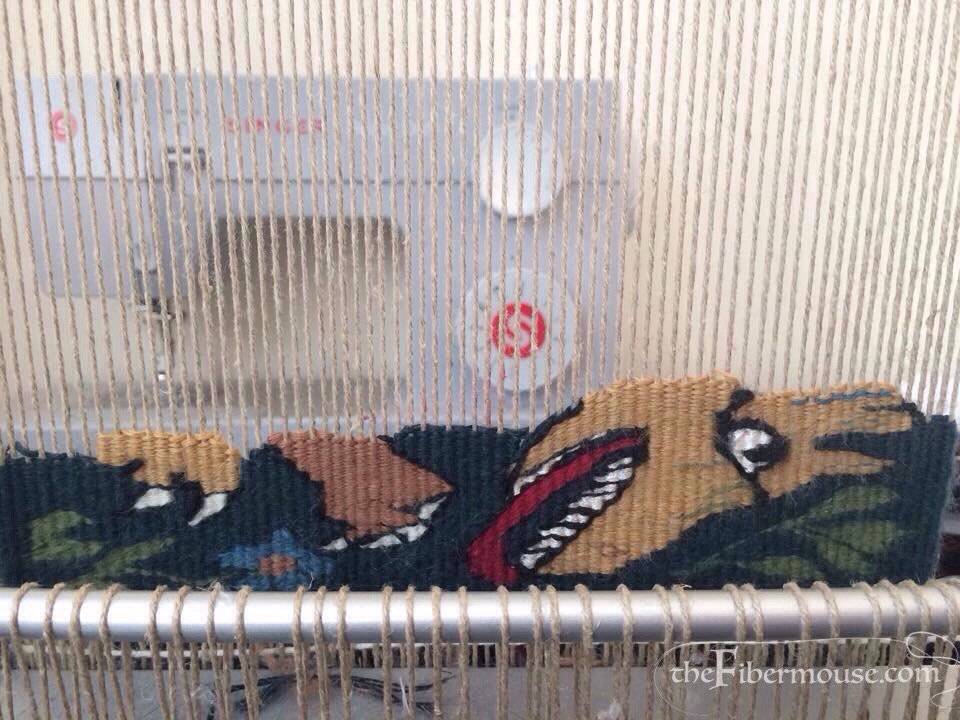
 Weave, weave, weave.


I made it to the end by the skin of my teeth. The thing was off the loom less than twelve hours before the competition, and tacked to a canvas mount less than twelve minutes before the competition. (The other elements of my entry have been previously featured on this blog, aside from a small book’s worth of documentation and references. Unfortunately, I forgot to photograph the display.) 

  
No, I didn’t win, but I placed in the finals and got a face-to-face judging– very good for a first attempt, I think! As the current champion of my local group, I was anxious to make a good showing, and I hope I did them proud.

  
And now my closet has its own fierce little guardian.

Historicity

Not everything I’m working on at the moment is clothing, or modern.

Case in point, a Nine Men’s Morris board that I made for my partner’s birthday:1-IMG_4138

And a tiny geteld (an Anglo-Saxon tent):

1-IMG_3997
I would like a full-sized one, too.

Some heraldic experiments for SCA purposes:
3-IMG_4035

4-IMG_4054

And a recently finished little pouch. This was a kit from a class I took in February, but mumble mumble busy. Actually, much of what I’ve been busy with has also been SCA-related. I went to a camping event in May where I picked up a few goodies and took exactly one photo of the site.

At the moment, I am reparing gores and finishing seams in anticipation of my very first PENNSIC (!). Once the existing stuff is up to scratch, I want to make an early Kentish or Merovingian ensemble along these lines.

As always, more ideas than time!

A Miniature Post

I have constructed a mead hall!

Well, half of one. In 1/24 scale.

One foot in model-land is equivalent to half an inch in ours.

Why a mead hall? I’m not actually sure. This is why I need to keep records. I’ve always enjoyed building miniature things, but the Anglo-Saxon idea was hatched last summer when I was on an Old English kick.

Now, I did some preliminary reserach on miniature-making and English history, but when it comes to authenticity, I’ve assigned no particular date to the building, and the construction techniques are based heavily on superglue. If these facts horrify any historians or miniature enthusiasts out there, I sincerely apologize.

Every mead hall needs a nice fire pit.

I started out by making a few artifacts: a fire pit, a two-beam loom, and some long tables and tablecloths. (I don’t think the tablecloths actually appear in any of these photos, but they do exist.) Most of the model itself is made of wood scraps from the hobby store, stained with a mixture of instant coffee and a bit of water and finished with a coat of shellac.

A miniature miniature workshop.

After the skeleton was finished, I acquired a folding table and put together a rough cork base for the model to rest on during construction. Sadly, it quickly outgrew the table.

Next came many hours with the instant coffee, and the addition of more artifacts. I also started adding wall panels. For anyone who might be inspired to take on a similar project, let me tell you that the cosmetic difference between painstakingly crafted wattle-and-daub walls and slapdash craft-painted basswood walls is negligible. Don’t bother.

An assortment of artifacts, with a paperclip for scale.
A closeup of the roof (which was originally a grass mat intended for pet bunnies) and a banner. There were supposed to be more banners, but embroidery at this scale is a pain and I haven’t managed to muster enough willpower for the task yet.
A rather disorganized meal. These things are actually too small and light to move around by hand, so I have to arrange them with tweezers. As you can see, I did not do so before this photo was taken.

Of course, there are plenty of tasks waiting to be done! Among them:

1) A floor, made of… something. According to my reading, timber is actually not the most historically probable. (I don’t have a source handy, but it’s somewhere in a stack of papers in my studio.) However, a dirt floor seems difficult to represent convincingly. I experimented with painting the cork on which the whole miniature building rests, but that was a no go. Other options? I’ve heard about a substance called paperclay, but it’s not available where I live. I do have some straw-like substance that might make convincing rushes, and I’m considering affixing the straw to a solid floor finished with a mix of craft paint and cornstarch.

2) A diorama-style backdrop for the shelf where the as-yet-unnamed hall now rests. As you can see, the current landscape leaves something to be desired.


3) Lamps, specifically cressets (a cresset being “an iron vessel or basket used for holding burning oil, pitchy wood, or other illuminant and mounted as a torch or suspended as a lantern : a fire basket.” Thanks, Merriam-Webster!). I keep trying to make these out of wire, but no success yet.

4) More chairs. Perhaps not the most interesting aspect to a blog reader, but I actually lost one of the seats for the central dais. (A common problem when you’re working with furniture the size of a thumbnail and have an unusually strong tendency to misplace things.)

5) Some Staffordshire Hoard goodies, of course! Have any of you ever worked with metal clay?

Despite these fledgling ideas, this whole project has been stuck in a state of semi-completion for months now. I’m hoping this post will inspire some reader comments to help me get it back on track!

(I’m also looking for suggestions for WordPress editors. I’m about to resort to Notepad out of frustration with this browser-based editor, which appears to be a close relative of the gastropods.)